Performing Database Migration using Azure DMS
- Abhijith Nair

- Jul 26, 2022
- 5 min read

In the last blog, we introduced a Database Migration Strategy that would help organizations prepare their databases for migrating over to Azure cloud. In this blog, I will explain how to migrate an on-premises SQL Server using both the online and offline methods provided by Azure Database Migration Service (DMS).
Database Migration Methods in Azure
There are multiple ways using which admins can perform database migration over to Azure. Following are the standard tools currently available:
1. Azure Database Migration Service
2. Microsoft Data Migration Tool
Some alternate methods to migrate databases in to Azure are as follows:
1. Using BACPAC files and import them through Azure portal
2. Using Bulk copy (bcp) command tool
3. Using Copy Activity in an Azure Data Factory pipeline
Prerequisites for Azure Database Migration Service
Following are the common recommended prerequisites that must be verified before working with Azure Database Migration Service
1. Check whether the SQL Server service is running. Select Start and search for Services. Here, the service is logged on as NT Service\MSSQLSERVER.

2. Create a network share location for the database backups to reside temporarily. Azure Database Migration Service will use this location to temporarily backup data. If this server is logged on as NT Service\MSSQLSERVER, make sure that MSSQLSERVER has full access to this network share folder.

3. Make sure that the network share location has sufficient space to store backups. In case of less space, you may also select a few databases and run the remaining as a new iteration in DMS.
Performing an Offline Migration in Azure
Additional Prerequisites
Apart from the common prerequisites, please make a note of the following while performing an offline migration.
1. A SAS URI is required that allows the DMS service to access your storage account container, where the backup files will be uploaded. To create a SAS URI, select the dedicated storage account, provide required permissions, and click Generate SAS and connection string.

Once the SAS URI is generated, Azure SQL MI would require the same to connect with the Azure Storage Account.
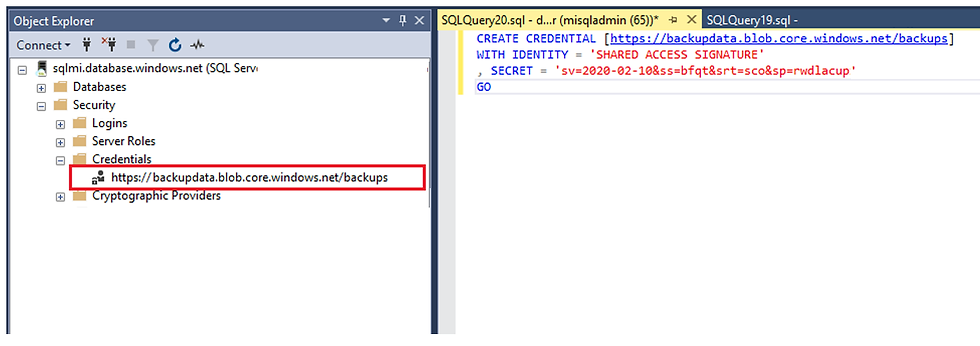
The above query is as follows:
CREATE CREDENTIAL [<COMPLETE BLOB NAME>]
WITH IDENTITY = 'SHARED ACCESS SIGNATURE',
SECRET = ‘<SAS URI>’
GO
Procedure
1. Search for Azure Database Migration Service in the Azure Portal. Provide project details such as subscription, service name, location, pricing tier etc. The pricing tier needs to be set as Standard to perform an offline migration.

2. In the Networking tab, select the subnet to be associated with the DMS service. Once all the details are reviewed, select Create.
3. On creating the Azure Database Migration Service, a migration project is required to be created for each instance/resource.

4. Select New Activity and select Offline data migration.

5. Provide necessary source instance name. Use either the IP address or the FQDN of the source server.

6. Provide necessary target SQL MI service details.

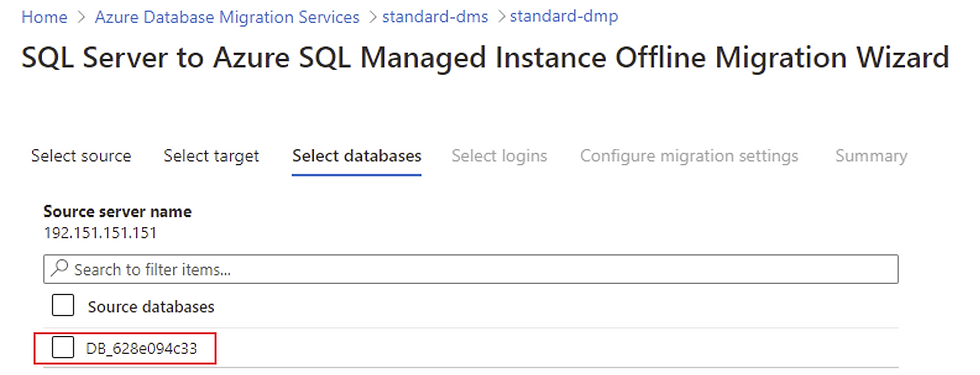
7. Select the required databases that needs to be migrated.
8. Select Logins that needs to be migrated. To migrate logins, the user needs to be part of the Azure Active Directory. Users can be added by creating them in the Azure Active Directory. Existing on-premises users can be synced with the Azure Active Directory using AD Connect.
Note: If there are users from multiple domains that needs to be migrated into Azure, irrespective of the method of migration, we need to make sure that these users are migrated separately, and their user mappings are verified manually.
9. In the Configure migration settings tab, choose appropriate backup option. If the admin can provide manual backups to the network share location, select ‘I will provide latest backup files’ option.
If the admin would want Azure to create backups on your behalf, select ‘I will let Azure Database Migration Service create backup files’ option. Also provide the network share location, user credentials and a SAS URI that allows the DMS service to access your storage account container where the backup files will be uploaded.

Note: All the network shared locations & SAS credentials that were used as part of this project can be found in the Appendix section of this document.
10. Once all the information is reviewed in the Summary tab, we can create a new iteration and run the project.
On successful offline migration of the databases and logins, the following results can be fetched from the desired migration project.

Performing an Online Migration in Azure
Additional Prerequisites
Apart from the common prerequisites, the following also needs to be met before performing an online migration.
1. Create a service principal is created as the DMS service would require the application id and key to access the target Azure SQL MI resource and Azure Storage Account. This service principal must have Contributor access to the subscription where the resources (SQL MI and Storage Account) exist.
2. The databases that must have a Full Recovery model.

3. The admin would require providing full and tail transactional backups for all the databases that needs to be migrated using the Azure DMS service. Technically, the Azure DMS only performs a restoration process to target Azure resource, while using an online migration.
Note: Once a full backup (.bak) is created, the transactional backups (.trn) should follow until the application cutover is performed. Once the Azure DMS service starts receiving transactional logs, no full backup must be created as this would result in different LSNs.
Procedure
1. Search for Azure Database Migration Service in the Azure Portal. Provide project details such as subscription, service name, location, pricing tier etc. The pricing tier needs to be set as Premium to perform an online migration.

2. In the Networking tab, select the subnet to be associated with the DMS service. Once all the details are reviewed, select Create.
3. On creating the Azure Database Migration Service, a migration project is required to be created for each instance/resource. Click on New Activity and select Online data migration.

4. Provide necessary source instance name. Use either the IP address or the FQDN of the source server.

5. Provide necessary target SQL MI service details. Provide the service principal application id and key that was created before creating the project.

6. Select all the required databases that needs to be migrated.
7. Provide the network share location, where all Full and Tail transactional backups are stored, along with the windows user and storage account information.

8. Once all the information is reviewed in the Summary tab, we can create a new iteration and run the project.
On successful online migration of databases, the following results can be viewed from the desired migration project.

Note: Online migration only migrates databases. To migrate logins, create a new activity (offline) and migrate only the required logins. Most importantly logins that are migrated separately may or may not be mapped with their corresponding databases. Hence, it is advised for the admin to verify that the user mapping is available for all logins that are migrated separately.


Comments